Drawing Fall Leaves (part one)
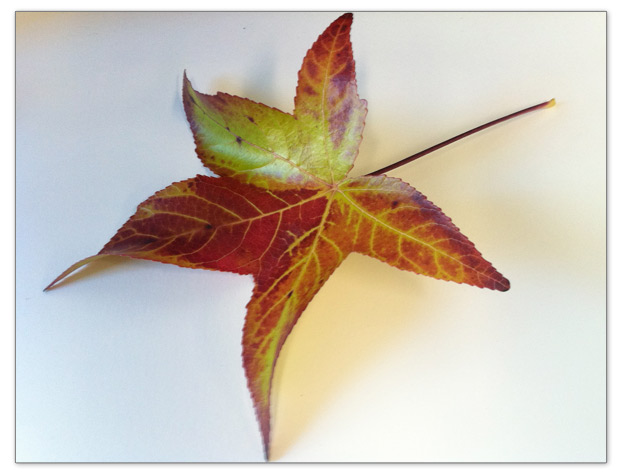
Fall Leaves or Any Leaf

Although very simple, the set-up of your still life with a fall leaf or a green leaf is important. Be sure to put a piece of white paper down on your table just above your drawing paper or pad. Lay the leaf onto the white paper and check to see if the light that is surrounding your area is casting some shadows from the leaf. If you need to change the light to make good shadows, change where you are set-up to draw or adjust the light if possible to have some shadows cast where the leaf blocks the light.
Determine where you will actually draw the leaf on the paper by temporarily moving the leaf onto your drawing paper. Determine where the center of the leaf will be on your drawing paper. Experiment by moving the leaf to find where you want the center stem of the leaf to be on your drawing paper. Make a note of this with one or two very small marks on your drawing paper that will still show and have meaning for you when you move the leaf back to the white paper. When you have finished making your placement notations move the leaf back onto the white paper above your drawing paper.

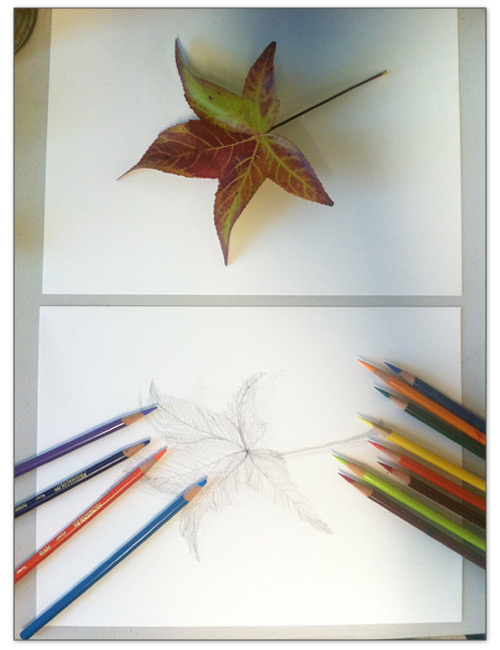
First in GRAPHITE

Let's call this is an exploratory drawing. You are just experimenting with the drawing to find out what is actually here in this leaf and how you will handle it. Don't think of it as a final drawing -- although you may be happy with it in any case. Thus, we CAN use a darker pencil while we are just experimenting and fooling around. You can call an exploratory drawing a study, a preparatory drawing or an experimental drawing. We are just keeping this initial experiment in the "low stakes" mode while we learn this method of using the veins of the leaf to very easily lay out the leaf on your paper.
In subsequent drawings with graphite or with colored pencil you will want to keep your "vein lines" VERY LIGHT. Usually the veins are LGHTER in value and color than the rest of the leaf. However, if you choose a dry leaf to draw -- the veins on a dry leaf can be darker than the rest of the leaf. Check this out on your leaf to see if you have light veins or darker veins. To draw the lighter central veins with graphite keep the lines very light (no pressure) so that you will be able to erase them back to a lighter value with your kneaded eraser later if you want. When you do draw the leaf with colored pencils use as light a yellow as you can see. Easy does it. Draw as lightly as you can! Drawing lightly allows for an easy adjustment of your drawing as you proceed with your drawing.
First the Veins

Next, draw the smaller veins that come off the main vein or veins. Constantly return to the center of the leaf and then work out to the edges of the leaf following the veins. Where you place the smaller veins will determine the shape of the leaf. Start each vein off of the central vein and take them out to the edge of the leaf. Do this for the whole leaf. Control any urges you may have to outline the leaf. Looking realistically at the leaf you will see that it does NOT have a darker outline around the edge of the leaf. Resist any desires you may have to make the edges of the leaf with dark outlines. Instead of drawing the edge of the leaf as a line that works its way around the edge of the leaf, you will get to your edge by drawing from your central vein or veins lightly out to the edges of the leaf.
When using fall leaves ignore any black or dark spots that have turned up on the leaf. The dark spots are easy for you to spot. These little identifiable details make you feel like there is something that you can easily see and easily draw. Resist any temptation to draw the dark spots. Why? Because they will take away the attention from the whole of the leaf. Details such a leaf spots that are unrelated to the form of the leaf do not contribute to the overall sensation of the leaf. Black spots or outstanding details such as these will distract the viewer. Details such as these that are just surface blemishes will become too prominent in your drawing. Rather than staying a very minor part of the leaf (because they are dark) they will steal the show and disrupt the flow. Some details -- especially when overly emphasized -- will take away from your drawing.
Be sure to draw the stem of the leaf. Just use one light line for the center of the stem rather than outlining the stem. Even though the stem is usually very thin you want to carefully build it out from the center using small light strokes to make the form of the stem with values that match the values of the stem.
Then the Shadows

Start your shadows by lightly drawing outward from the edge of the leaf and NOT leaving a white space between the leaf and the shadow. There is NOT a white space between the leaf and the shadow underneath the leaf. Be sure to not put any dividing line or lines between the leaf and the shadow (a white line or a dark line). Check to see if you are doing this. This is a very automatic approach that just sort of happens in the beginning stages of drawing shadows that come from underneath a leaf. Because they come from under the leaf -- the shadows on the paper butt up to the leaf. Work outward from "under your leaf" to the very light edges of the shadow.
Look closely at the edges of the shadows to see how they actually are. The farther a shadow (cast on the white paper) is away from the thing that is blocking the light (the leaf) then the fuzzier the edge of the shadow will be. Conversely, the closer that the shadow is to what is blocking the light (the leaf) then the crisper the edge of the shadow will be near the leaf. Be sure to check out the actual edges of all the shadows. Really look and really see. Be on the lookout for going on automatic and drawing what you think you see.

For more information on Margaret Welty go to: www.margaretwelty.com -- but first SIGN-UP HERE FOR THE DRAWINGFREE EZINE.
Copies of each issue for DrawingFree Ezine can be found on the DrawingFree Web-site:
www.drawingfree.com
Copyright 2010 Margaret Welty. All Rights Reserved. Permission is granted to link to this site, information or to quote WITH author notation: "From the Drawing Free Ezine Created by Margaret Welty at www.drawingfree.com".

Presented by Margaret Welty and the Drawing Dog
Each lesson presented in the Drawing Free Ezine gives you ways to massage your own neurological white matter to further form and train your ever transitioning ART BRAIN. Remember that the key is to DRAW, play and be easy with yourself. Eliminate any unrealistic expectations and judgements about your work. Work to be happy while you draw! Draw like a child with no expectations beyond your current beginner's brain, eyes, hands and heart. Orient your focus toward the fascination that consumes a small child upon discovering that she can make her own marks appear. Make your own marks appear!!
Create a chance to draw. Draw every chance you get.
Make a space to draw. Draw in every space you make.